LabTrack User Manual
By Mohtasim Hadi Rafi on May 19, 2026
This manual documents every feature and workflow in LabTrack for members, administrators, and content editors. Read the section that matches your role, then refer to specific workflow sections as needed.
1. Getting Started
1.1 Logging In
Open LabTrack in your browser. The root URL (/) redirects to the dashboard.
If you are not logged in you are redirected to the login page (/accounts/login/).
Enter your email address/username and password.
Click Log In.
If you forget your password, contact a LabTrack administrator. There is no self-service password reset.
1.2 Registering an Account
If registration is open at your lab:
- Go to
/accounts/register/. - Fill in your email address, username, and password (confirmed twice).
- Click Register.
Your account is created but set to inactive pending admin approval. You cannot log in until an administrator activates your account and assigns a role.
Administrators: New self-registered accounts appear as inactive in the user list. Activate them and assign a role before they can use the system.
1.3 User Roles
LabTrack has two roles:
| Role | Access |
|---|---|
| Member | Browse and reserve equipment; manage their own kits; report incidents; manage CMS content they own or that is member-accessible |
| Admin | Everything a Member can do, plus: manage users and roles; approve/reject equipment registrations; view the full activity log; access all CMS sections; perform any action on any record |
Roles are assigned by an administrator from the Members page. A superuser created with createsuperuser automatically has the Admin role.
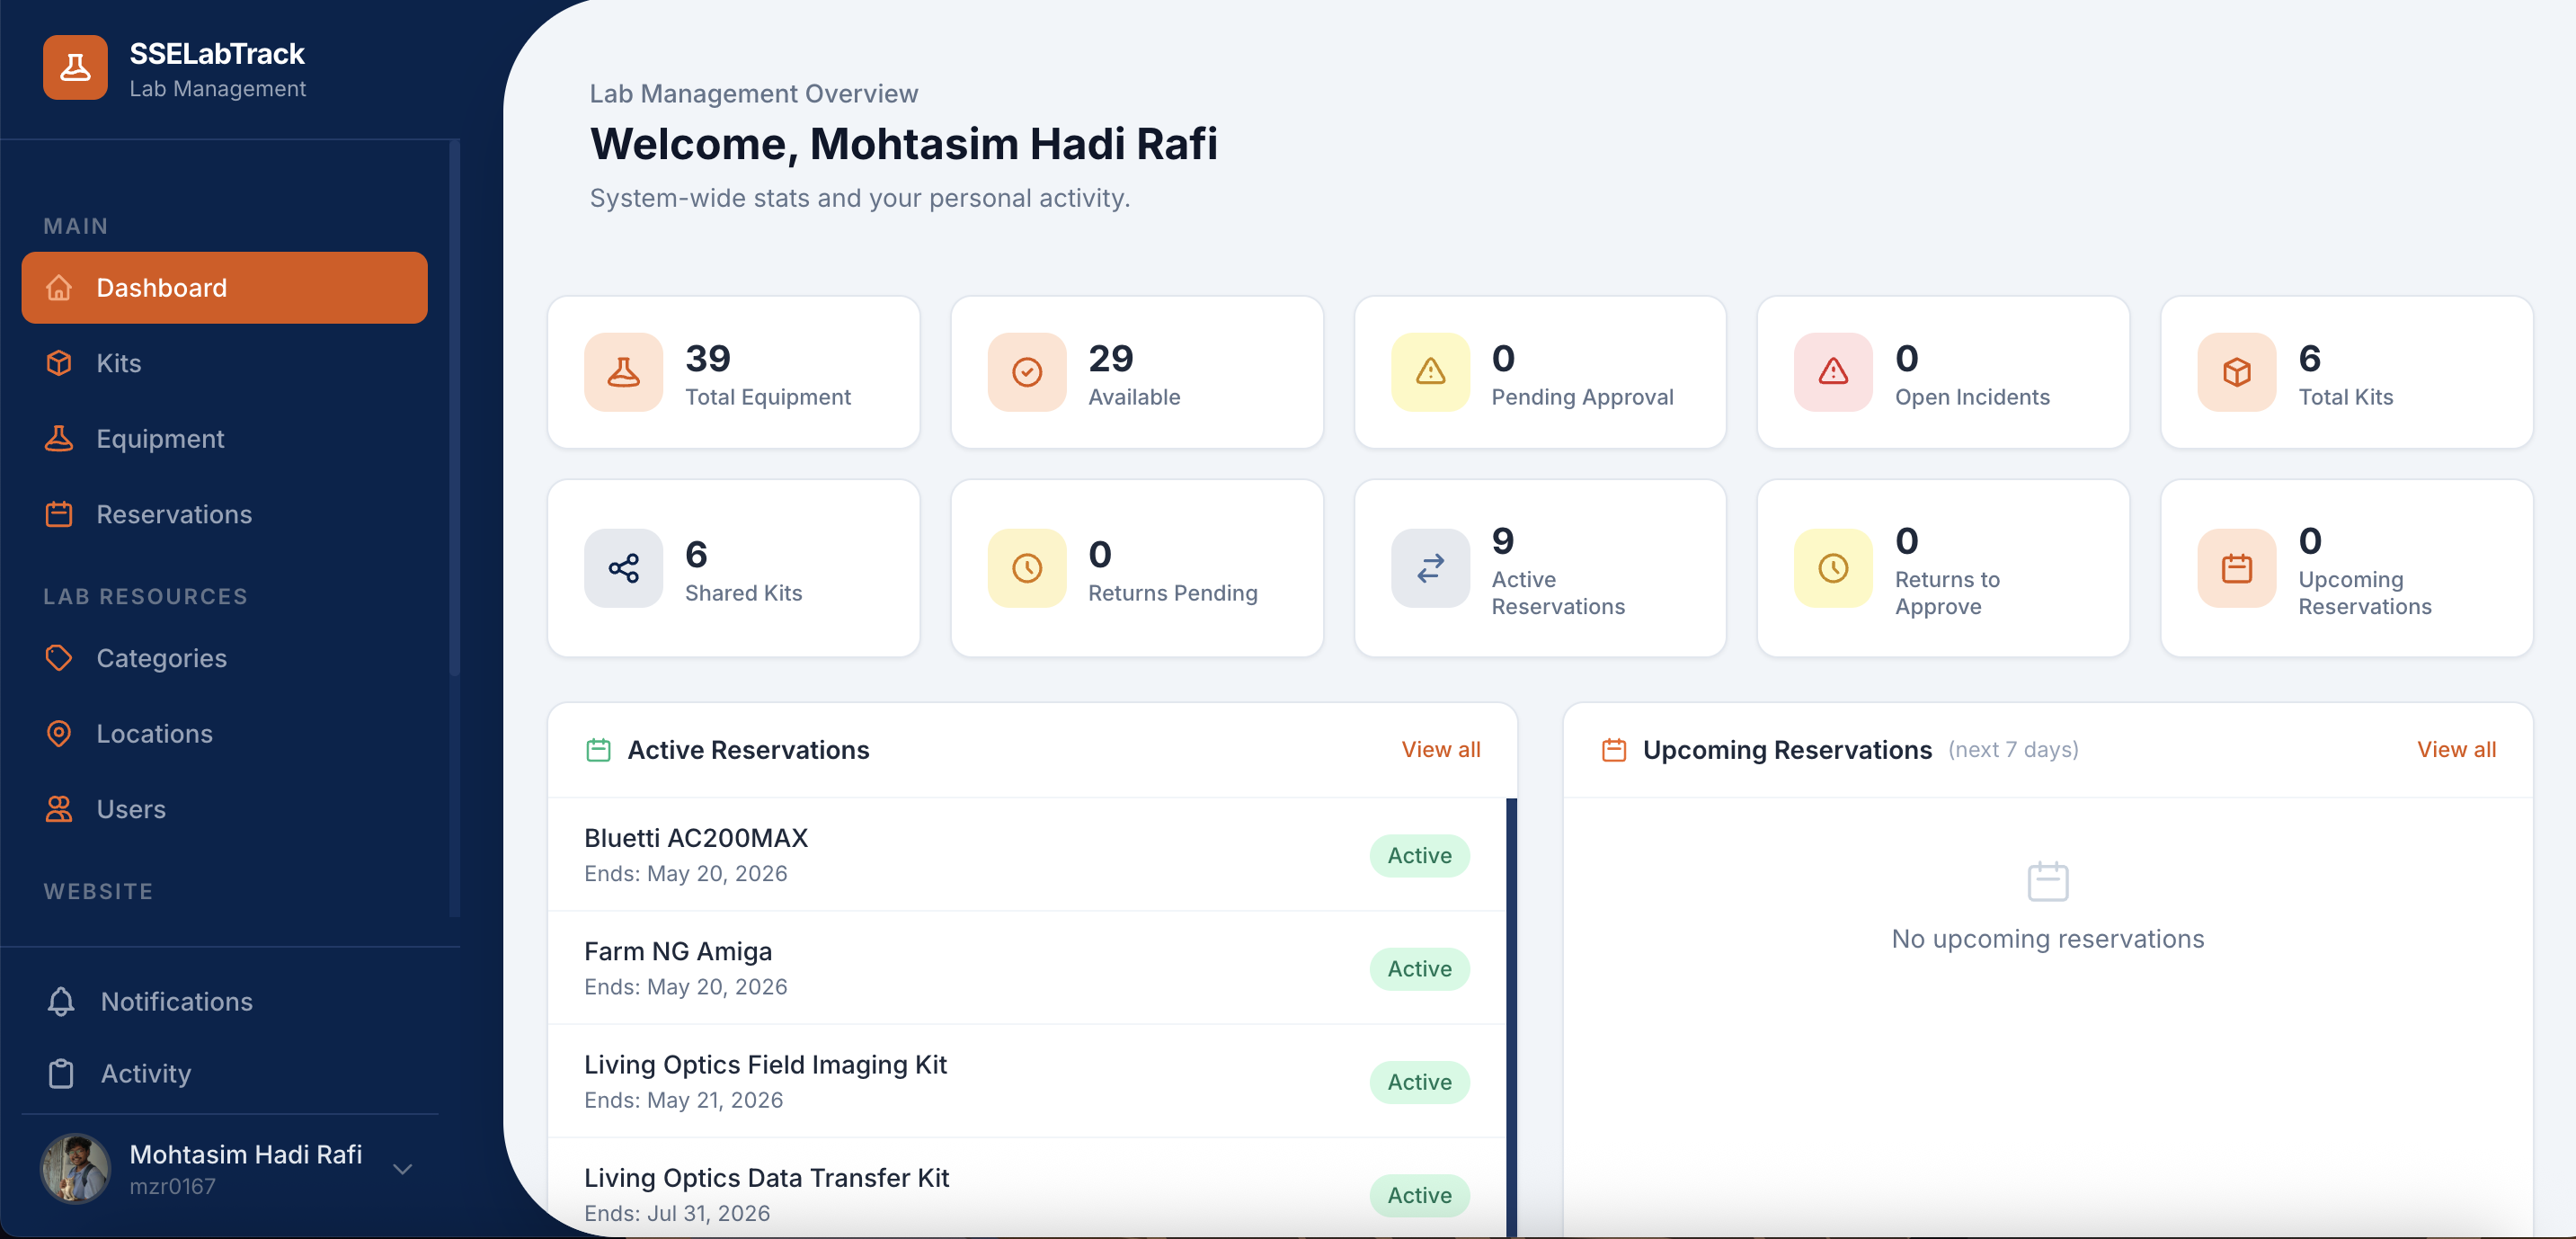
1.4 The Dashboard
After login you land on the unified dashboard (/dashboard/). All users see the same page, but admins see additional system-wide panels.
Everyone sees:
- Active Reservations — equipment and kits you currently have checked out, with due dates
- My Pending Returns — reservations you have submitted for return that are awaiting owner confirmation
- Pending Return Approvals — reservations where you are the equipment owner and the borrower has submitted a return
- Upcoming Reservations — confirmed or pending reservations starting within the next 7 days
- Pending Owned Equipment — equipment you own that is still awaiting admin approval
- Recent Notifications — your last 5 unread notifications
- Recent Activity — your last 10 actions in the system
Admins additionally see:
- Stats bar: total active equipment, available equipment, pending equipment approvals, pending returns, open incidents
- Total kits and shared kits counts
- Overdue Reservations — reservations whose end date has passed but are still CONFIRMED or ACTIVE
- System Activity — last 15 actions across the entire system
1.5 Navigation
The left sidebar (collapsed on mobile with the hamburger menu) links to every module. The top bar shows:
- The notification bell with an unread count badge — click to open the notification drawer
- Your avatar / username — click to access your profile or log out
2. Your Profile
2.1 Viewing Your Profile
Click your username or avatar in the top bar, then Profile, or navigate to /accounts/profile/.
The profile page shows:
- Your name, email, username, role, and date joined
- Contact information (phone, department, student ID)
- Bio
- Profile photo
- Academic links (Google Scholar, LinkedIn, GitHub, personal website)
- Lab position (PI, Postdoc, PhD, M.S., Undergraduate, Staff, Visitor)
- Membership dates (start and end date)
- Your current notification preferences (summary)
- Borrow and reservation statistics
2.2 Editing Your Profile
From the profile page click Edit Profile, or go to /accounts/profile/edit/.
You can update:
- First and last name
- Phone number
- Department
- Student ID
- Bio
- Profile photo (JPEG/PNG, max 20 MB)
- Lab position, start date, end date
- Google Scholar, LinkedIn, GitHub, personal website URLs
Click Save Changes to apply.
2.3 Changing Your Password
From your profile page click Change Password (or /accounts/password/change/).
- Enter your current password.
- Enter and confirm your new password.
- Click Change Password.
You remain logged in after the change.
2.4 Notification Preferences
From the profile edit page, scroll to Notification Preferences.
Global toggles:
- In-app notifications — when disabled, no in-app notifications are created for you
- Email notifications — when disabled, no emails are sent to you regardless of per-category settings
Per-category toggles (only apply when email notifications are globally enabled):
- Borrowing
- Reservations
- Incidents
- Equipment
- Kits
- Projects
- System
Disabling a category suppresses both in-app and email notifications for events in that category. Enabling a category while email notifications are globally off only enables in-app delivery.
3. Equipment
3.1 Browsing and Searching
Navigate to Equipment (/equipment/) to see all active, approved equipment.
Filter options (top of the page):
- Search — matches against name, serial number, model number, manufacturer, and description
- Category — dropdown of all categories
- Location — dropdown of all locations
- Owner — filter by equipment owner
- Status — Available, Borrowed, Reserved, Under Maintenance, Damaged, Retired
- Condition — Excellent, Good, Fair, Poor, Damaged
Results can be viewed as a list (20 per page) or a grid (12 per page). Each card shows the equipment name, status badge, condition, category, location, and owner.
Bulk actions: Select multiple items with the checkboxes on each card to perform bulk actions from the floating bar:
- Reserve — reserve all selected items for a date range
- Delete (admin only) — retire all selected items in one operation
Members see only Approved equipment plus any Pending equipment they registered themselves. Admins see all equipment including Pending approval items.
3.2 Equipment Details
Click any equipment card or name to open its detail page.
The detail page shows:
- Full description, serial number, model number, manufacturer
- Category, location, owner, current status and condition
- Purchase date and price (if recorded)
- Photo
- Reservation history — last 10 reservations against this item
- Lifecycle timeline — events such as purchase, maintenance, repairs, and status changes
- Movement log — history of location changes
- Maintenance history — scheduled and completed maintenance logs
- Calibration history — precision check records
- For admins: an Approve button if the item is pending approval
- A Reserve button to open a reservation form for this item
- An Edit button (visible to the owner and admins)
- A Log Incident button (visible to all members)
3.3 Registering New Equipment
Any logged-in member can register equipment they own.
- Go to Equipment → Add Equipment (
/equipment/create/). - Fill in:
- Name (required)
- Description
- Serial number (must be unique across all equipment; leave blank if unknown)
- Model number
- Manufacturer
- Category (required) — select existing or create a new one inline
- Location (required) — select existing or create a new one inline
- Owner (required) — defaults to yourself; admins may assign to another user
- Status (defaults to Available)
- Condition (defaults to Good)
- Photo (required when creating; JPEG or PNG, max 20 MB)
- Purchase date, purchase price, notes (all optional)
- Click Add Equipment.
Approval: If you set yourself as the owner, the equipment is immediately approved and visible to everyone. If you register equipment and assign a different owner, it enters Pending Approval status and is only visible to you and admins until an admin approves it.
A PURCHASED lifecycle event is recorded automatically when equipment is created.
3.4 Approval Workflow
When a member registers equipment with a different owner, it appears in the Pending Approval queue.
As an admin: 1. Open the equipment detail page (the item appears in the equipment list for admins even when Pending). 2. Click Approve to make it visible to all members, or Reject to decline.
3.5 Editing Equipment
Equipment can be edited by its owner or any admin.
- Open the equipment detail page.
- Click Edit.
- Update any fields.
- Click Save Changes.
If the current user is not the owner and not an admin, the edit attempt is redirected back to the detail page with an error message. No changes are saved.
3.6 Moving Equipment
When equipment moves to a new physical location:
- Open the equipment detail page.
- Click Log Movement.
- Select From Location (pre-filled with the current location) and To Location.
- Optionally enter a reason.
- Click Save.
A movement record is appended to the movement log and the equipment's location is updated.
3.7 Lifecycle Events
A lifecycle event records a significant moment in an equipment item's history.
Event types:
- Purchased — added to inventory (auto-created on registration)
- Deployed — put into active service
- Sent to Maintenance — removed from service for repair
- Repaired — returned from repair
- Damaged — damage discovered
- Retired — permanently taken out of service
- Status Changed — any other status transition
- Condition Changed — condition update
- Note — free-form note
To add an event: 1. Open the equipment detail page. 2. Scroll to Lifecycle Timeline and click Add Event. 3. Choose the event type and enter a description. 4. Click Save.
3.8 Deactivating and Retiring
Admins can retire equipment that should no longer appear in the inventory (retired, lost, or scrapped). Retiring hides the item from all lists without deleting its history.
From the equipment list: 1. Select one or more items using the checkboxes on each card. 2. Click Delete Selected in the floating action bar. 3. Confirm the action. The equipment status is set to Retired and is_active is set to False.
From the Django back-office (/backoffice/): Admins can also set is_active = False directly on the equipment record for fine-grained control.
3.9 Categories and Locations
Categories and locations are shared across equipment. All authenticated users can browse the category and location lists from the sidebar.
Creating a category: 1. Go to /equipment/categories/create/. 2. Enter a name and optional description. 3. Leave Color blank for an auto-generated unique color, or pick one. 4. Click Save.
Creating a location: 1. Go to /equipment/locations/create/. 2. Enter a name (e.g., "Cabinet A"), optional building, room, and description. 3. Click Save.
Both can also be created inline from the equipment registration form using the "+" button next to the dropdown.
4. Reservations
Reservations are the primary way to check out equipment or kits. A reservation can be for a future date range (traditional reservation) or starting immediately today (immediate checkout).
4.1 Creating a Reservation
- Navigate to Reservations → New Reservation (
/reservations/create/), or click Reserve on an equipment detail page. - Select either Equipment or Kit (not both).
- Enter:
- Start date — first day of your reservation (can be today)
- End date — last day of your reservation
- Purpose — describe the planned use
- Click Submit.
What happens next:
- If your start date is today or earlier, the reservation is immediately set to ACTIVE — the item is considered checked out to you.
- If your start date is in the future, the reservation is set to CONFIRMED — the period is booked.
The equipment owner receives a notification for awareness.
Note: Reservations that overlap a confirmed or active reservation for the same item will be blocked. Check the calendar before creating a reservation to avoid conflicts.
Bulk reservation: From the equipment list, select multiple available items with checkboxes, then click Reserve Selected in the floating action bar to reserve them all at once with the same date range.
4.2 Reservation Status Reference
| Status | Meaning |
|---|---|
| PENDING | Submitted; awaiting owner confirmation (rarely used) |
| CONFIRMED | The period is booked; item is reserved for future use |
| ACTIVE | The reservation has started; item is checked out |
| RETURN_PENDING | Requester submitted return; awaiting owner confirmation |
| RETURNED | Owner confirmed return; transaction complete |
| CANCELLED | Cancelled by the requester before the end date |
| COMPLETED | Period ended normally |
| EXPIRED | End date passed without any return action |
Status flow:
CONFIRMED → ACTIVE → RETURN_PENDING → RETURNED
       ↘ CANCELLED    ↘ EXPIRED (via scheduled command)
4.3 Viewing Your Reservations
Go to Reservations (/reservations/) to see all your reservations listed with their status, dates, and item.
4.4 Calendar View
The calendar at /reservations/calendar/ shows all CONFIRMED and ACTIVE reservations from all members as blocks on a monthly calendar. Use the left/right arrows to navigate between months.
Hovering over a block shows the item name and requester. This view is useful for checking availability before creating a new reservation.
4.5 Cancelling a Reservation
You can cancel a reservation that is in CONFIRMED or ACTIVE status.
- Open the reservation detail page.
- Click Cancel Reservation.
- Confirm the cancellation.
If someone is on the waitlist for the same equipment, the first person in the queue receives an automatic notification.
4.6 Submitting a Return
When the reservation period is over and you have physically returned the item:
- Open the reservation detail page.
- Click Return Item.
- Select the Return Condition:
- Excellent
- Good
- Fair
- Poor
- Damaged
- Enter any notes (optional but recommended if the condition is not Good).
- Click Submit Return.
Status becomes RETURN_PENDING and the equipment owner is notified.
You can only submit a return when the reservation is in ACTIVE or CONFIRMED status.
4.7 Confirming a Return
- Go to Reservations (
/reservations/) and look for items with status RETURN_PENDING, or click the notification link. - Open the reservation detail page.
- Click Confirm Return.
Status becomes RETURNED and the requester is notified.
Only the equipment (or kit) owner can confirm the return. Other members attempting to confirm are redirected with an error.
4.8 The Waitlist
If the equipment you need is already reserved or unavailable, you can join the waitlist.
To join the waitlist: 1. On the equipment detail page, click Join Waitlist (visible when the item is unavailable). 2. Enter optional notes (e.g., when you need it by). 3. Click Submit.
You are assigned a position in the queue. Duplicate entries for the same user and item are rejected.
When you are notified: When a confirmed reservation for the item is cancelled, LabTrack automatically notifies the first person in the queue (position 1). After notification, that entry is marked as notified but remains in the list until the user leaves manually.
To leave the waitlist: Open your waitlist entries, find the entry, and click Leave Waitlist. Your entry is deleted.
4.9 Overdue Reservations
A reservation is overdue when its end date has passed while the status is still CONFIRMED or ACTIVE.
Overdue reservations appear prominently on the admin dashboard. The system does not detect overdue items in real time — a scheduled management command (expire_reservations) must be run periodically. See Scheduled Tasks in the Admin Guide.
When a reservation is marked expired:
- Its status changes to EXPIRED.
- The equipment status is recomputed and may become AVAILABLE again.
- The requester and owner are not explicitly notified (unlike the old borrow overdue system).
5. Kits
A kit is a named bundle of equipment items that can be reserved together as a single unit.
5.1 Creating a Kit
- Navigate to Kits → New Kit (
/kits/create/). - Enter:
- Name (required)
- Description (optional)
- Share with all members — see Sharing a Kit
- Click Create Kit.
The kit is created with no items. You are redirected to the kit detail page.
5.2 Adding Items
From the kit detail page:
- Click Add Item.
- Select the Equipment from the dropdown.
- Set the Quantity (defaults to 1).
- Enter optional Notes for this item.
- Click Add.
Each item can only appear once per kit. To adjust the quantity, remove the item and re-add it with the correct quantity.
Removing an item: Click the Remove button next to the item in the kit detail page.
5.3 Sharing a Kit
By default, a kit is private — only you can see and reserve it.
To share: 1. Open the kit detail page. 2. Click Edit Kit. 3. Check Share with all members. 4. Click Save.
Shared kits appear in the Shared Kits section of the kit list for all members. Any member can then reserve the shared kit. You retain ownership and must confirm returns.
5.4 Reserving a Kit
Reserving a kit works the same as reserving individual equipment:
- Go to Reservations → New Reservation (
/reservations/create/). - Leave Equipment blank and select your Kit.
- Fill in start date, end date, and purpose.
- Click Submit.
Or click Reserve from the kit detail page.
The kit reservation is automatically confirmed. Note that the individual equipment items inside the kit are not locked from simultaneous individual reservations — plan accordingly.
5.5 Returning a Kit
Returning a kit follows the standard reservation return workflow:
- The borrower opens the reservation detail page and clicks Return Item.
- Status becomes RETURN_PENDING.
- The kit owner confirms the return.
- Status becomes RETURNED.
Unlike the old borrow system, kit returns do not require per-item owner confirmation. The kit creator is the single owner who confirms the return.
5.6 Editing and Deleting
Edit: From the kit detail page, click Edit Kit. You can change the name, description, and shared status.
Delete: From the kit detail page, click Delete Kit. This permanently removes the kit and all its item records. Existing reservations linked to the kit are preserved (the kit field becomes null). Only the kit creator or an admin can delete a kit.
6. Incidents
The incidents module tracks equipment damage, safety issues, and operational faults through a resolution workflow.
6.1 Reporting an Incident
Any member who discovers a problem with equipment should report it immediately.
- Navigate to Incidents → Report Incident (
/incidents/create/), or click Log Incident on the equipment detail page. - Fill in:
- Equipment (required) — the affected item
- Title (required) — short summary, e.g., "Screen cracked"
- Description (required) — detailed description of the issue
- Severity:
- Low — minor cosmetic or non-blocking issue
- Medium — affects usability but not safety
- High — significant impairment or safety concern
- Critical — immediate safety risk or complete failure
- Photo (optional) — attach an image of the damage
- Click Report Incident.
The incident is created with status Open and you are recorded as the reporter. The equipment owner receives a notification.
6.2 Incident Status Reference
| Status | Meaning |
|---|---|
| Open | Reported; no investigator assigned yet |
| Investigating | Assigned to an investigator; work in progress |
| Resolved | Issue addressed; awaiting closure review |
| Closed | Fully closed; no further action needed |
Status flow:
Open → Investigating → Resolved → Closed6.3 Assigning an Investigator
The reporter, the equipment owner, or an admin can assign an investigator.
- Open the incident detail page.
- Click Assign Investigator.
- Select a user from the dropdown.
- Click Assign.
The status changes to Investigating and the assignee receives a notification.
6.4 Resolving an Incident
The assignee or an admin marks the incident resolved when the issue has been addressed.
- Open the incident detail page.
- Click Mark Resolved.
- Enter a Resolution description — describe what was done to fix the issue.
- Click Resolve.
Status changes to Resolved. The reporter receives a notification.
6.5 Closing an Incident
After the resolution has been reviewed and accepted:
- Open the incident detail page.
- Click Close Incident.
Status becomes Closed. Closed incidents remain in the list for historical reference but cannot be re-opened.
6.6 Maintenance Logs
Maintenance records track scheduled or completed servicing of equipment.
To add a maintenance log: 1. Open the equipment detail page. 2. Click Log Maintenance. 3. Fill in:
- Maintenance type: Preventive, Corrective, Inspection, or Calibration
- Status: Scheduled, In Progress, Completed, or Cancelled
- Performed by — the person doing or overseeing the work
- Description — what needs to be or was done
- Scheduled date — planned date
- Completed date (optional) — actual completion date
- Cost (optional)
- Notes (optional)
- Click Save.
Maintenance logs are visible on the equipment detail page under Maintenance History.
6.7 Calibration Logs
Calibration logs track precision checks for measurement equipment.
To add a calibration log: 1. Open the equipment detail page. 2. Click Log Calibration. 3. Fill in:
- Calibrated by
- Calibration date
- Next calibration date (optional) — for scheduling recurring checks
- Status: Pass, Fail, or Pending
- Certificate number (optional)
- Notes (optional)
- Click Save.
7. P-Card Purchase Tracking
The P-Card module tracks lab purchase transactions with itemized line items, receipt uploads, and admin-approved deletion requests.
7.1 Recording a Transaction
- Navigate to P-Card → Record Purchase (
/pcard/create/). - Fill in:
- Transaction date (required)
- Total price (required)
- Receipt file — upload an image or PDF of the receipt
- Notes (optional)
- Add itemized line items:
- Click Add Item
- Enter Name, Description, Quantity, and Unit price
- Repeat for each item purchased
- Click Save Transaction.
The transaction is saved and all admins receive a notification.
7.2 Viewing Transactions
Navigate to P-Card (/pcard/) to see all transactions.
Filter options:
- Date range — filter by start and end dates
- Search — search by item names or notes
Each transaction card shows the date, total price, number of items, and a receipt preview if available. Click a transaction to view its full detail page with all line items.
7.3 Editing a Transaction
- Open the transaction detail page.
- Click Edit.
- Update any fields or modify line items.
- Click Save.
7.4 Requesting Deletion
Members cannot directly delete P-Card transactions. Instead, they must request deletion, which requires admin approval.
- Open the transaction detail page.
- Click Request Deletion.
- Enter a reason for the deletion request.
- Click Submit Request.
The request enters a Pending status. All admins are notified.
Admins: Go to P-Card → Deletion Requests (/pcard/deletion-requests/) to view the queue. Click Approve to delete the transaction permanently, or Reject to deny the request. Both actions notify the requester.
7.5 Exporting Data
Excel export: Navigate to /pcard/export/excel/ to download all transactions (filtered by date range if set) as an Excel spreadsheet.
PDF export: Navigate to /pcard/export/pdf/ to compile all receipt images into a single PDF document.
8. Files
LabTrack uses a custom database-backed file storage system. Files are stored as binary blobs in the database rather than on the filesystem, which makes the system portable and avoids filesystem dependency issues in containerized deployments.
The StoredFile model tracks:
- Filename
- MIME type
- Binary data
- Size (in bytes)
- Created at timestamp
Files are uploaded automatically when you:
- Attach a receipt to a P-Card transaction
- Upload an equipment photo
- Upload a profile avatar
- Attach an incident image
There is no standalone file browser in the UI. Files are managed in the context of the object they belong to. Admins can view and manage all stored files through the Django back-office (/backoffice/files/storedfile/).
9. Public Website & CMS
LabTrack includes a fully CMS-driven public lab website. The public site is visible to anyone without login. The CMS (Content Management System) is a custom admin interface at /admin/cms/ where lab members and admins manage the site's content.
9.1 Public Site Overview
The public website consists of these pages:
| Page | URL | Content |
|---|---|---|
| Home | / | Hero section, stats bar, about teaser, lab highlights, sponsors, CTA |
| About | /about/ | Lab mission, history, editable sections |
| Projects | /projects/ | Research projects with domains and team members |
| Publications | /publications/ | All publications, filterable by year |
| Blog | /blog/ | Published blog posts, filterable by tag |
| News | /news/ | News announcements |
| Team | /team/ | Active lab members grouped by position |
| Alumni | /alumni/ | Former lab members |
| Data | /data/ | Data resources, datasets, software, tools |
| Jobs | /jobs/ | Open job positions |
| Sponsors | /sponsors/ | Funding and collaborative partners |
| Contact | /contact/ | Contact form and info blocks |
9.2 CMS Dashboard
The CMS dashboard at /admin/cms/ is the landing page for content management.
Count cards (clickable, linking to each management area):
- Always visible: Publications, Blog Posts, News Items, Public Projects
- Admin-only: Job Openings, Alumni, Sponsors, Homepage Stats, Highlights, Page Sections, Contact Messages
Recent Notifications (left column):
- Up to 5 unread notifications for the current user.
Recent CMS Activity (right column):
- Up to 10 recent CMS actions (create, update, delete) showing who did what and when.
9.3 Member CMS Access
Members (non-admin users) can access these CMS sections:
- Publications — create, edit (any publication). Cannot delete or fetch DOI.
- Blog Posts — create (auto-assigned as author), edit own posts, delete own posts.
- News Items — create, edit. Cannot delete.
- Public Projects — full CRUD (create, edit, delete).
Members cannot access admin-only sections such as Homepage Highlights, Stats, Job Openings, Sponsors, Alumni, Page Sections, or Contact Messages.
Admins can do everything members can, plus manage all admin-only sections and delete any content across all models.
9.4 Publications
Publications represent the lab's research output.
Fields:
- DOI (optional, unique) — supports auto-fetching metadata from Crossref
- Title, Authors, Journal, Year, Volume, Issue, Pages
- Abstract, URL, PDF file
- Featured toggle — highlighted publications
Creating a publication: 1. Go to CMS → Publications → Add Publication. 2. Fill in the details. 3. Click Save.
DOI Auto-Fetch (admin only): If you enter a DOI, admins can click Fetch DOI to automatically populate title, authors, journal, year, volume, issue, pages, and abstract from Crossref.
9.5 Blog Posts
Blog posts are long-form articles authored by lab members.
Fields:
- Title, Slug (auto-generated from title)
- Content (rich text via CKEditor5)
- Author (auto-set to the creator)
- Featured image
- Published status and publish date
- Tags (comma-separated)
Creating a blog post: 1. Go to CMS → Blog Posts → Add Blog Post. 2. Write your content. 3. Toggle Published when ready to go live. 4. Click Save.
Members can only edit or delete their own blog posts. Admins can manage all posts.
9.6 News Items
News items are short announcements about lab achievements, events, and updates.
Fields:
- Title
- Content (rich text)
- Image (optional — displayed on the homepage if the news item is highlighted)
- Published at (datetime)
Creating a news item: 1. Go to CMS → News Items → Add News Item. 2. Fill in the title and content. 3. Upload an image if desired. 4. Click Save.
9.7 Public Projects
Public projects showcase the lab's research projects on the public website.
Fields:
- Title, Description (rich text)
- Status (Active / Completed)
- Funding source
- Image
- External link
- Research domains (multi-select)
- Team members (multi-select from lab users)
Creating a public project: 1. Go to CMS → Public Projects → Add Project. 2. Fill in the details. 3. Select research domains and team members. 4. Click Save.
Members have full CRUD access to public projects.
9.8 Homepage Highlights
Highlights are cards that appear on the public homepage, showcasing selected Projects, Publications, News Items, or Job Openings.
Managing highlights: 1. Go to CMS → Homepage Highlights. 2. The page shows two sections:
- Current Highlights — items already on the homepage, shown in a table
- Available Items — un-highlighted content you can add
Adding a highlight: Find the item you want in the Available Items section and click Add. It is automatically appended to the end of the highlight list.
Reordering: Drag any row in the Current Highlights table by its drag handle (the hamburger icon on the left). Drop it in the desired position. The order is saved automatically and a "Order saved" toast appears.
Removing a highlight: Click Delete next to a highlight. This only removes the highlight reference; the original content item is preserved.
Editing a highlight: Click Edit to change the highlight's order number or active status.
Image-bearing highlights (Projects and News Items with images) are sorted first on the public homepage, followed by text-only cards.
9.9 Homepage Stats
Stats are the numbers displayed in the colored bar on the public homepage (e.g., "15+ Publications", "8 Active Projects").
Fields:
- Label (e.g., "Publications")
- Value (e.g., "15+")
- Order
- Active toggle
Admins can create, edit, reorder, and deactivate stats from CMS → Homepage Stats.
9.10 Job Openings
Job postings appear on the public /jobs/ page.
Fields:
- Title, Description, Requirements (all rich text)
- Status (Open / Filled)
- Tags
- Order
- Active toggle
Only admins can manage job openings.
9.11 Sponsors
Sponsors are displayed on the homepage and the dedicated /sponsors/ page.
Fields:
- Name, Description
- Logo image
- Website link
- Partner type (Funding Partner / Collaborative Partner)
- Order
- Active toggle
Only admins can manage sponsors.
9.12 Alumni
The alumni page (/alumni/) shows two sources: 1. Inactive user accounts (users whose accounts have been deactivated) 2. Manually created Alumni records for people without LabTrack accounts
Alumni record fields:
- Name, Email, Position
- Start date, End date
- Current affiliation
- Photo, Bio
- Google Scholar, LinkedIn, GitHub, Personal website links
- Order, Active toggle
Only admins can manage alumni records.
9.13 Page Sections
Page sections are editable content blocks that appear on static pages (Home, About, Jobs, Data, Projects, Contact).
Each section has:
- Page — which page it belongs to
- Section key — a unique identifier (e.g., "hero", "about_teaser", "cta")
- Title, Subtitle, Content (rich text)
- Order and Active toggle
Admins can create, edit, and reorder page sections. Sections are referenced by their key in the templates, so adding a new section requires a developer to wire it into the template.
9.14 Contact Messages
When a visitor submits the contact form on the public site, the message is stored as a Contact Message and all admins are notified.
Admins can:
- View the list of all contact messages at CMS → Contact Messages
- Open a message to read the full details
- Delete messages after handling them
There is no reply mechanism within LabTrack — admins should reply via their regular email.
9.15 Research Domains & Data Resources
Research Domains are the research areas the lab works in (e.g., "Robotics", "Computer Vision"). They appear on the public Projects page and can be associated with Public Projects and team members.
Data Resources are publications, datasets, software, and tools displayed on the public Data page.
Both are managed by admins from their respective CMS sections.
10. Notifications
10.1 In-App Notifications
The notification bell in the top bar shows a badge with the count of unread notifications.
Click the bell (or navigate to /notifications/) to open your notification inbox.
Each notification shows:
- A description of the event
- The time it was created (relative, e.g., "3 hours ago")
- A link to the related object (e.g., the reservation, incident, or equipment)
- A read / unread indicator
Marking notifications as read:
- Open the notification inbox page (
/notifications/) — all unread notifications are automatically marked as read when the page loads. - Click Mark All Read to clear all unread indicators at once.
- Click an individual Mark as read button to clear a single notification without leaving the page.
10.2 Email Notifications
When SMTP is configured, every in-app notification also triggers an email to the recipient's registered email address, provided: 1. The user has Email Notifications globally enabled in their profile. 2. The user has the per-category toggle enabled for that event type.
Email links use the absolute SITE_URL configured in the server environment so they work correctly from any email client.
10.3 Notification Events Reference
| Event | Who is notified |
|---|---|
| New reservation created | Equipment / kit owner |
| Reservation starts today | Requester + owner |
| Reservation period ended | Requester + owner |
| Reservation cancelled | Requester; next person on waitlist (if any) |
| Return submitted | Equipment / kit owner |
| Return confirmed | Requester |
| Reservation expired | (No direct notification; logged to activity) |
| Equipment registered (pending) | All admins |
| Equipment approved | Registering member |
| Incident reported | Equipment owner |
| Incident assigned to you | Assignee |
| Incident resolved | Reporter |
| Incident status updated | Reporter |
| P-Card transaction recorded | All admins |
| P-Card deletion requested | All admins |
| P-Card deletion approved | Requester |
| P-Card deletion rejected | Requester |
| User registered (pending approval) | All admins |
| User activated | The user |
| User deactivated | The user |
| User role changed | The user |
| Contact message received | All admins |
| CMS content created/updated/deleted | All admins |
11. Activity Log
The activity log at /activity/ is an immutable audit trail of every significant action performed in LabTrack.
Each entry records:
- Actor — the user who performed the action
- Action type — e.g., RESERVATION_CREATED, EQUIPMENT_UPDATED, INCIDENT_REPORTED, CMS_UPDATED
- Description — human-readable summary of what happened
- Timestamp — exact date and time
Access:
- Admins see the full system-wide activity feed at
/activity/. - Members see only their own actions at
/activity/mine/.
The activity log is read-only — entries cannot be edited. Admins can delete individual entries if needed.
Use the activity log to:
- Investigate who changed a piece of equipment's status
- Audit reservation and return transactions
- Track user logins and logouts
- Identify who filed or resolved an incident
- Review CMS content changes
12. Admin Guide
12.1 First-Time Setup
After deploying LabTrack for the first time:
- Run
python manage.py createsuperuser(ordocker compose exec web python manage.py createsuperuser) and create an account with your email and a strong password. - Log in to LabTrack.
- Go to Members (
/accounts/users/) and confirm your account shows the Admin role (superusers are automatically Admin). - Create Categories at
/equipment/categories/create/(e.g., "Electronics", "Measurement", "Safety"). - Create Locations at
/equipment/locations/create/(e.g., "Lab A", "Storage Cabinet 1"). - Register your first equipment items.
- Set up CMS content (homepage stats, highlights, page sections) for the public site.
- If email notifications are needed, configure SMTP in
.envand restart the server.
12.2 Managing Members
Go to Members (/accounts/users/) to see all registered users.
The list shows each user's username, email, role, and status. Use the search bar to find users by name, email, or username. Filter by role (Admin / Member) or status (Active / Inactive / Pending).
Creating a user: 1. Click Create User. 2. Fill in email, username, password, name, and role. 3. Click Save.
The new user is created as active and receives a welcome notification.
Viewing a user: Click a user's name to see their full profile, recent activity (last 20 actions), and current reservations.
Editing a user: Click Edit on the user detail page to update their identity, profile, and notification preferences.
Activating / Deactivating: Click Toggle Active to flip a user's active status. Deactivating prevents login. Activating sends an approval notification to the user.
Deleting a user: Click Delete. You cannot delete your own account. The action is logged and all admins are notified.
12.3 Assigning Roles
- Go to Members (
/accounts/users/). - Click the user's name to open their profile.
- Click Change Role.
- Select Admin or Member.
- Click Save.
The user is notified of their role change.
Users with no role assigned cannot access any module. Always assign a role to newly registered users.
12.4 Admin Dashboard
The admin dashboard at /dashboard/ provides a real-time overview:
- Stats bar: total active equipment, available equipment, pending equipment approvals, pending returns, open incidents
- Overdue Reservations — reservations whose end date passed without return
- System Activity — last 15 actions across the entire system
- Recent Members — last 5 accounts created
12.5 Admin Panel
The admin panel at /admin/ is a management hub distinct from the Django back-office.
It shows counts for every module (users, equipment, reservations, kits, incidents, categories, locations, maintenance, calibration, and all CMS content types). Click any card to jump to that module's list view.
12.6 Approving Pending Equipment
When a member registers equipment with a different owner it enters the Pending Approval queue.
- Open the equipment detail page for the pending item (visible to admins in the equipment list).
- The page shows an Approve button in the top action area.
- Click Approve.
The item is immediately visible to all members. The registering member receives a notification.
To reject instead: 1. Go to the equipment detail page. 2. Click Reject (sets approval_status = REJECTED and hides the item).
12.7 Return Queue
The return queue shows all reservations with status RETURN_PENDING — items that borrowers have submitted for return but owners have not yet confirmed.
Admins can view all pending returns. Equipment owners see only returns for items they own.
To confirm a return: 1. Open the reservation detail page. 2. Click Confirm Return.
12.8 Scheduled Tasks
LabTrack relies on two management commands that should be run daily via cron, Celery, or systemd timer:
expire_reservations — Expires confirmed reservations whose end date has passed.
# Run daily at midnight
python manage.py expire_reservations
This transitions CONFIRMED reservations with end_date < today to EXPIRED and frees up the equipment status.
check_reservation_notifications — Sends start/end notifications and transitions reservation statuses.
# Run daily in the morning
python manage.py check_reservation_notifications
This:
- Transitions
CONFIRMEDreservations starting today toACTIVEand notifies both parties - Transitions
ACTIVEorCONFIRMEDreservations ending today toRETURN_PENDINGand notifies both parties
Docker cron setup: The docker-compose.yml includes a scheduler service that runs these commands daily at 08:00 America/Chicago time.
12.9 Django Back-Office
The Django admin back-office at /backoffice/ provides direct database access for advanced management.
Configured admin interfaces:
- Users — with inline UserProfile editing, including research domains
- User Profiles — searchable by email, username, department, student ID
- Stored Files — view all database-backed files
- Activity Logs — browse and filter the full audit trail
- All CMS models (Publications, Blog Posts, News Items, etc.)
Use the back-office for operations that don't have a dedicated frontend UI, such as:
- Bulk-editing user profiles
- Manually adjusting research domain associations
- Viewing raw database records
- Managing stored files directly
13. URL Reference
| Path | Description |
|---|---|
/ | Redirects to /dashboard/ |
/dashboard/ | Unified dashboard |
/admin/ | LabTrack admin panel (custom management hub) |
/backoffice/ | Django built-in back-office (direct DB access) |
/accounts/login/ | Login page |
/accounts/register/ | Self-registration |
/accounts/profile/ | View own profile |
/accounts/profile/edit/ | Edit profile and notification preferences |
/accounts/users/ | Member list (admin only) |
/equipment/ | Equipment list |
/equipment/create/ | Register new equipment |
/reservations/ | Reservation list |
/reservations/create/ | Create a reservation |
/reservations/calendar/ | Calendar view of all reservations |
/kits/ | Kit list |
/incidents/ | Incident list |
/notifications/ | Notification inbox |
/activity/ | Activity log (admins see all; members see own) |
/activity/mine/ | Personal activity log |
/pcard/ | P-Card transaction list |
/pcard/create/ | Record a new purchase |
/pcard/export/excel/ | Export transactions to Excel |
/pcard/export/pdf/ | Compile receipts to PDF |
/pcard/deletion-requests/ | Deletion request queue (admin only) |
/admin/cms/ | CMS dashboard |
/admin/cms/publications/ | CMS publications list |
/admin/cms/blog-posts/ | CMS blog posts list |
/admin/cms/news-items/ | CMS news items list |
/admin/cms/public-projects/ | CMS public projects list |
/admin/cms/homepage-highlights/ | CMS homepage highlights |
/admin/cms/homepage-stats/ | CMS homepage stats |
/admin/cms/job-openings/ | CMS job openings |
/admin/cms/sponsors/ | CMS sponsors |
/admin/cms/alumni/ | CMS alumni |
/admin/cms/page-sections/ | CMS page sections |
/admin/cms/contact-messages/ | CMS contact messages |
/about/ | Public about page |
/projects/ | Public projects page |
/publications/ | Public publications list |
/blog/ | Public blog list |
/news/ | Public news list |
/team/ | Public team page |
/alumni/ | Public alumni page |
/data/ | Public data/resources page |
/jobs/ | Public job openings page |
/sponsors/ | Public sponsors page |
/contact/ | Public contact page |
14. Troubleshooting
Cannot log in after registering
Self-registered accounts are created as inactive. Contact an administrator to activate your account and assign a role. You will see "Your account is pending admin approval" on the login page until then.
Equipment does not appear in the list
- Check that the equipment is Approved (not Pending).
- Check that the equipment is Active (not Retired).
- Admins see all equipment; members see only Approved equipment plus their own Pending items.
Reservation overlap error
The item is already reserved or active for part of your requested date range. Use the calendar view (/reservations/calendar/) to check availability, or join the waitlist.
Email notifications not being sent
Step 1 — Check which email backend is active:
docker compose exec web python -c "from django.conf import settings; print(settings.EMAIL_BACKEND)"If it prints ...console.EmailBackend, then EMAIL_HOST_USER or EMAIL_HOST_PASSWORD is missing. Set both in .env and restart.
Step 2 — Test delivery directly:
docker compose exec web python manage.py shell -c "
from django.core.mail import send_mail
send_mail('Test', 'Hello', None, ['you@example.com'])
print('OK')
"
Step 3 — Check the user's notification preferences. They may have disabled email globally or for a specific category.
Static files return 404
docker compose exec web python manage.py collectstatic --noinput
docker compose restart nginx
Web container exits immediately
docker compose logs webCommon causes:
DB_HOSTis set but MySQL hasn't finished starting — wait a few seconds and restart:docker compose restart web.- Mismatched
DB_PASSWORD(orMYSQL_ROOT_PASSWORD) between.envand thedbservice. - When using
docker-compose.mysql.yml, thedbhealthcheck must pass beforewebstarts — checkdocker compose psto confirmdbis healthy.
CSRF verification failed in production
Ensure ALLOWED_HOSTS includes your actual domain and that the Host header is forwarded correctly from Nginx. The provided nginx/nginx.conf already sets proxy_set_header Host $host for this purpose.
Full development reset
# Self-contained MySQL setup
docker compose -f docker-compose.yml -f docker-compose.mysql.yml down -v
docker compose -f docker-compose.yml -f docker-compose.mysql.yml up -d
docker compose -f docker-compose.yml -f docker-compose.mysql.yml exec web python manage.py createsuperuser

# External MySQL setup
docker compose down -v
docker compose up -d
docker compose exec web python manage.py createsuperuser
Container status
docker compose ps
docker compose logs --tail=50 web